Home / Docs / IVR & Phone Menus / Multi-Level Menus and Timeouts (Step by Step Guide)
Multi-Level Menus and Timeouts (Step by Step Guide)
A phone menu does not have to be a single flat list of options. Any option on a menu can link to an entirely different menu, which is what makes multi-level menus possible.
How linking works in practice. For example, "Press 2 for Support" does not have to forward directly to a person. It can instead lead into its own sub-menu, like "Press 1 for Billing, Press 2 for Technical Issues," which then has its own set of destinations. There is no fixed limit baked into the concept of how many levels deep this can go. It is built from the same simple building block, an option pointing to another menu, repeated as many times as your call flow actually needs.
Handling a caller who does not respond. Every menu has a configurable timeout, which is how long TelBuddy waits for a caller to press something before deciding they are not going to. What happens after that timeout is also something you configure, rather than the call simply hanging or disconnecting silently.
Handling an invalid entry. Similarly, if a caller presses a digit that is not a valid option on that menu, you control what message plays back to them, so a mistaken keypress leads to a clear "that was not a valid option, please try again" instead of dead air or an abrupt failure.
Why both settings matter. Without a configured timeout and invalid-entry message, a caller who hesitates or misdials is left with a noticeably worse experience than one who moves through the menu correctly on the first try. These two settings are what make a menu feel complete rather than merely functional.
Features at a glance
- Any menu option can link to another menu, enabling multi-level structures
- No fixed depth limit: sub-menus can lead to further sub-menus as needed
- Configurable timeout for callers who do not respond
- Configurable message for invalid or unrecognized key presses
- Sub-menus support every action a top-level menu does, including forwarding and voicemail
How the pieces fit together
Two fields do the work of connecting menus, and it helps to understand them before building.
Node Key is the short internal name of a menu, such as main, sales, or support. Callers never hear it. It exists so other menus can point at it, so it needs to be unique and worth keeping simple: lowercase, no spaces.
Go To Menu Node is the action you give an option when it should lead to another menu instead of a person. You set it to the Node Key of the menu you want, and that is the entire link.
So "Press 2 for Support opens the support menu" is really just: an option with keypad digit 2, action Go To Menu Node, pointing at the node key support.
Build the sub-menu first, then point at it. The link is made by typing a Node Key, so the target needs to exist before the option that references it makes sense.
Step by step: build a second menu for support
-
Add a second menu node
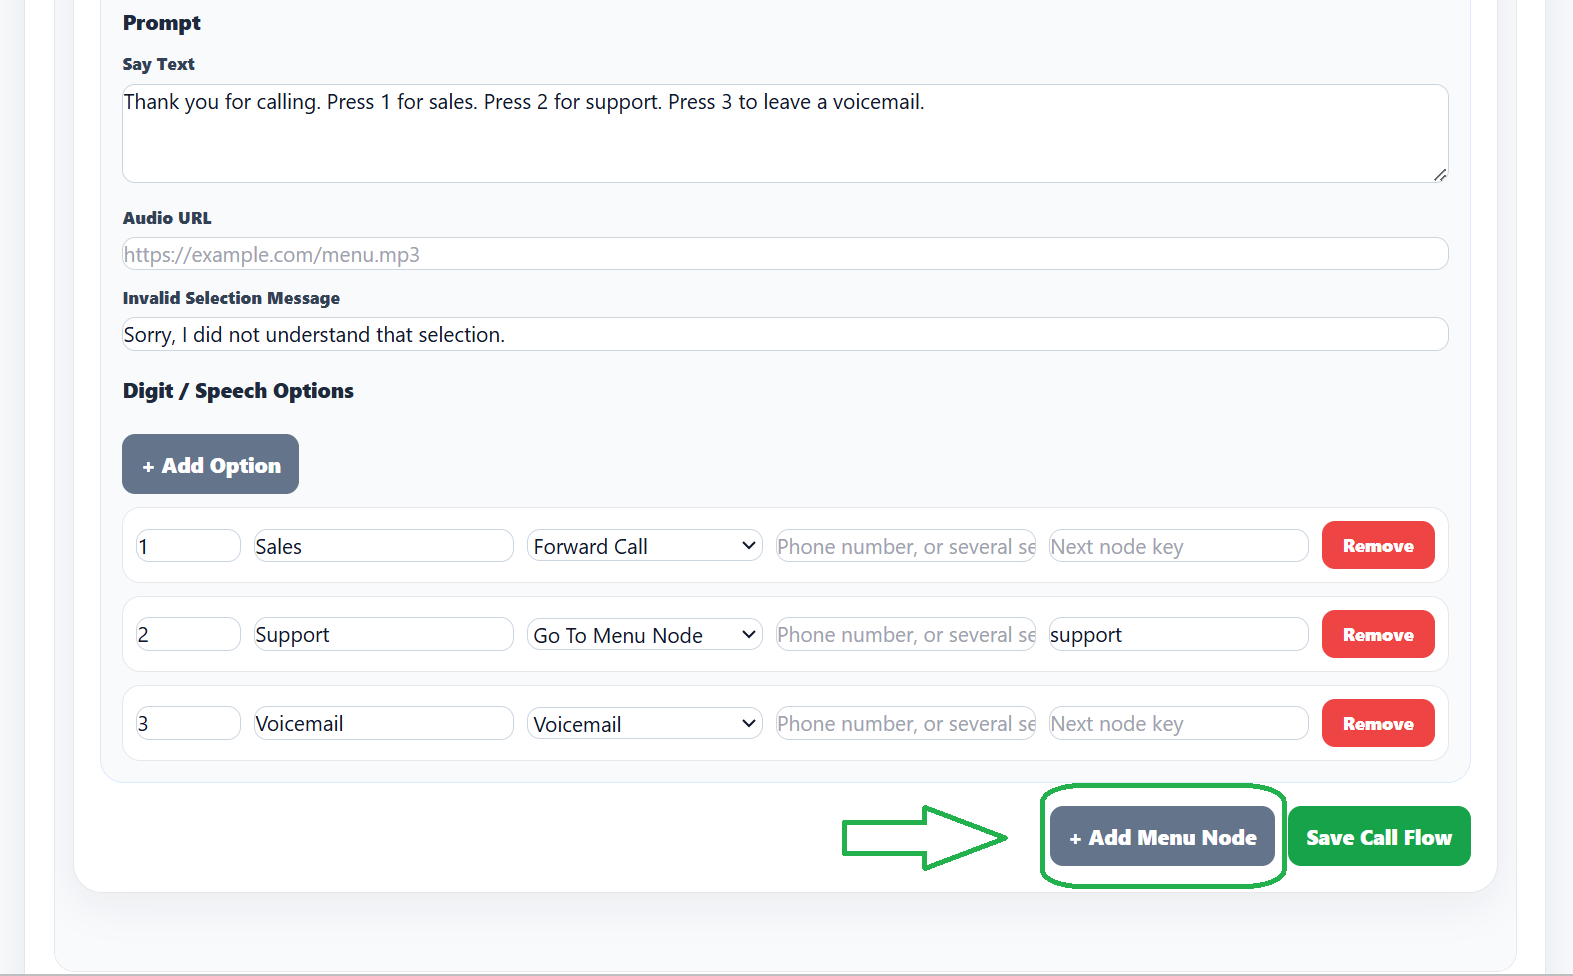
In the Call Menu / IVR Builder, click + Add Menu Node. This creates a second menu alongside your existing main menu.
Your main menu is what callers hear first. This new one is what they will reach only after choosing an option, so nothing changes for callers until you link the two together in step 3.
-
Fill in the new menu, then save
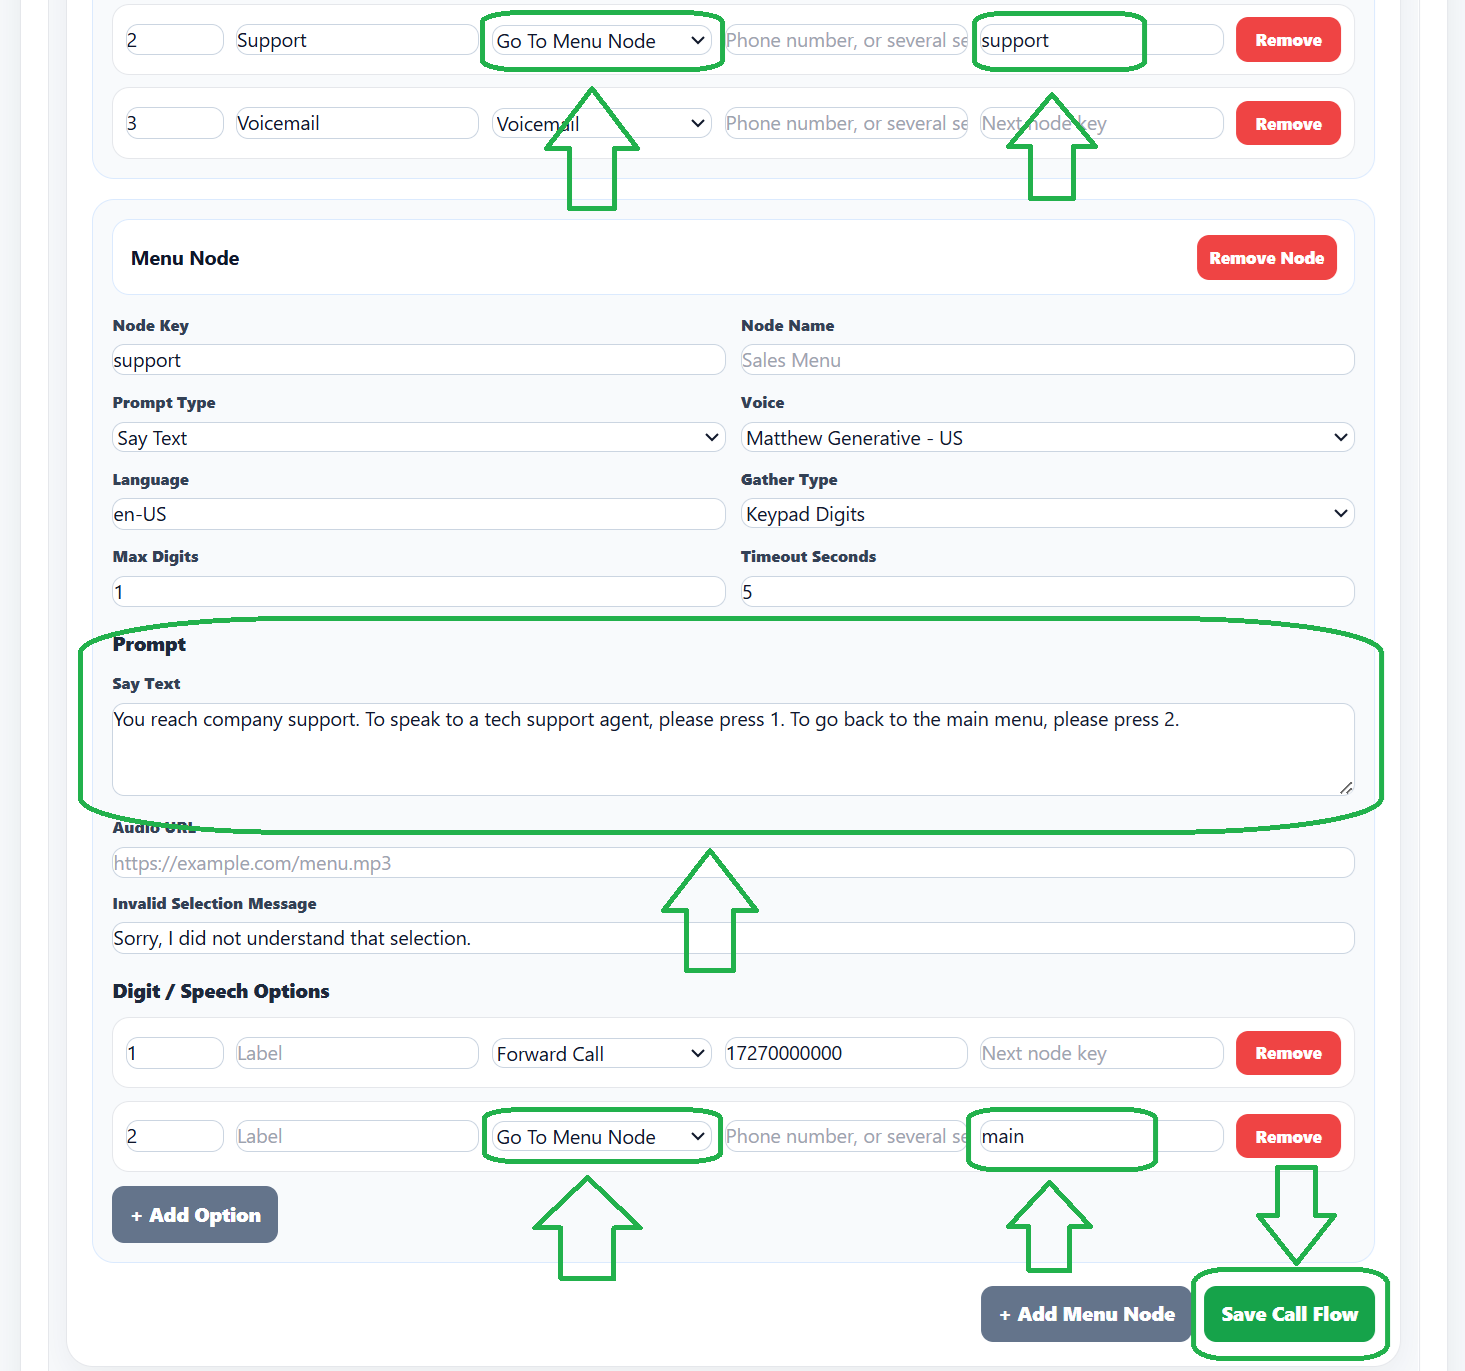
Give the new node a Node Key that describes it, such as
support. This is the name you will point at later, so keep it short and lowercase.Then set it up exactly like your main menu:
- Prompt is what callers hear when they arrive here, for example: "For billing, press 1. For technical support, press 2. To go back, press 9."
- Digit / Speech Options are the choices on this menu. Each one can forward, go to voicemail, repeat, hang up, or link to yet another menu.
- Timeout Seconds is how long to wait for a response. The default is 5 seconds, and anything from 1 to 30 is allowed. Around 5 to 7 works well: long enough for someone to finish listening, short enough that it does not feel broken.
- Invalid Selection Message is what plays when a caller presses something that is not an option here. Write it as a full sentence, such as "Sorry, that is not a valid option. Let me repeat the choices."
Click Save Call Flow when the menu is filled in.
-
Link your main menu to it
The new menu exists, but nothing reaches it yet. Go back to your main menu and find the option that should lead there, for example the one on digit
2.Change that option's action to Go To Menu Node and enter the Node Key you just created,
support. Save the call flow again.That is the whole link. Callers pressing 2 on the main menu now hear the support menu instead of being forwarded to a person.
-
Add a way back
This step is optional but strongly recommended. On the sub-menu, add one more option, such as digit
9, with the action Go To Menu Node pointing back atmain.Callers who choose the wrong branch would otherwise have to hang up and call again. A "press 9 to go back to the main menu" option costs nothing and prevents that.
What happens on a timeout or a wrong key
Both cases behave the same way, and it is worth knowing exactly what a caller experiences.
If a caller says nothing and presses nothing before the timeout expires, or presses a digit that is not configured on that menu, TelBuddy plays your Invalid Selection Message and then repeats the same menu from the top. The call is not dropped and the caller is not sent somewhere unexpected. They simply get another chance.
That means the Invalid Selection Message is doing double duty. It is what a confused caller hears and what a hesitant caller hears, so it is worth writing to cover both: something like "Sorry, I did not get that. Here are the options again." reads naturally in either case, where "That was an invalid selection" sounds odd to someone who simply did not press anything.
If you leave the Invalid Selection Message blank, the menu still repeats, but with no explanation first. The caller hears the greeting start over with no idea why, which is exactly the confusing experience these settings exist to prevent.
Keeping menus usable
You can do this as many times as you need to build out your business phone menu. A few things worth keeping in mind as it grows:
- Keep each menu to about four options. Callers do not remember more than that, and long menus get re-listened to, which adds time to every call.
- Two levels deep is usually plenty. By the third level, most callers would rather have reached a person.
- Put the most common choice first. If most calls are sales, make that option 1.
- Always offer a way to reach a human. A "press 0 to speak to someone" option on every menu is a good safety valve, especially for callers who cannot find their situation in the list.
- Test the whole tree after changes. Call in and walk every branch, including the wrong keys, so you find a broken link before a customer does.