Home / Docs / IVR & Phone Menus / Building Your First Phone Menu (Step by Step Guide)
Building Your First Phone Menu (Step by Step Guide)
The IVR builder is how you create a "Press 1 for Sales, Press 2 for Support" style phone menu. It is genuinely no-code, but it is built around forms rather than a drag-and-drop canvas.
What "no-code" actually means here. To be precise about the interface: clicking + Add Menu Node opens a form where you fill in what plays when a caller reaches that menu, and for each digit a caller might press, what that option does and where it leads next. There is no visual canvas with boxes and connecting lines to arrange. Every option is configured by filling in a straightforward form, which is deliberately simpler to build with even if it is less visually flashy than a canvas-style builder.
What an option can actually do. Each digit on a menu can be configured to forward the call to a person, send it to voicemail, repeat the current menu (useful if a caller missed the options the first time), hang up, hand the call to your AI receptionist, or link to a completely different menu, enabling menus with multiple layers rather than a single flat list.
Applying a menu. Once a menu is saved, it takes effect immediately on any number it is assigned to. There is no separate publish or deploy step, and no delay before it is live for callers.
Features at a glance
- Form-based, click-to-build menu creation: no code, no canvas to arrange
- Each digit option can forward, send to voicemail, repeat, hang up, or link to another menu
- Callers can press a key or simply say what they want, using the same menu
- Menus apply immediately once saved and assigned to a number
- Works identically on Twilio and Telnyx numbers
Before you start
You will need a phone number already connected to TelBuddy, and at least one number you want calls forwarded to. If you have not connected a number yet, do that first, then come back here.
The whole setup below takes about five minutes.
Step by step: how to set up a simple IVR
-
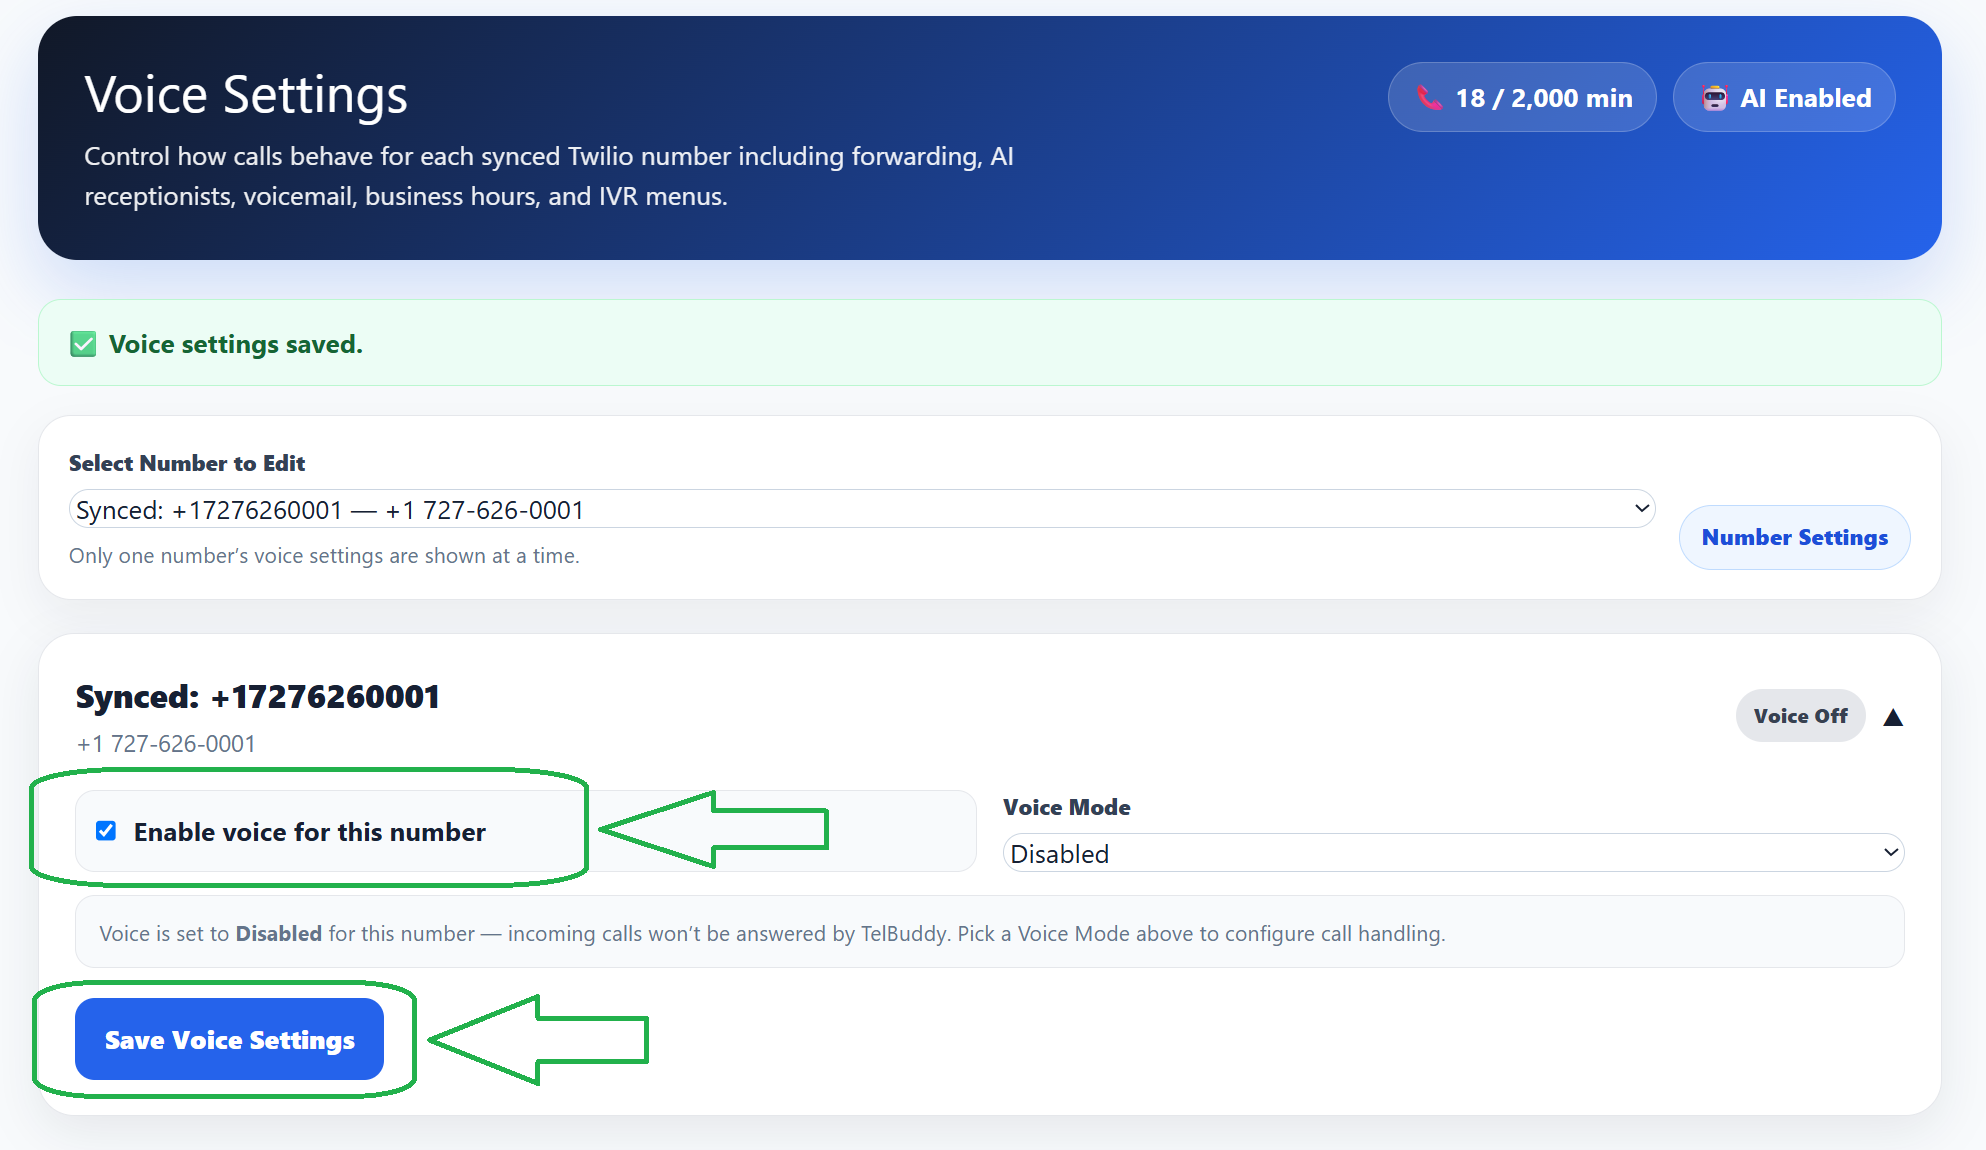
Enable voice for your number
Open Voice Settings and choose the number you want to set up from the Select Number to Edit dropdown. Tick Enable voice for this number.
Until this is on, TelBuddy will not answer calls to that number at all, so this is the switch that turns the whole feature on.
-
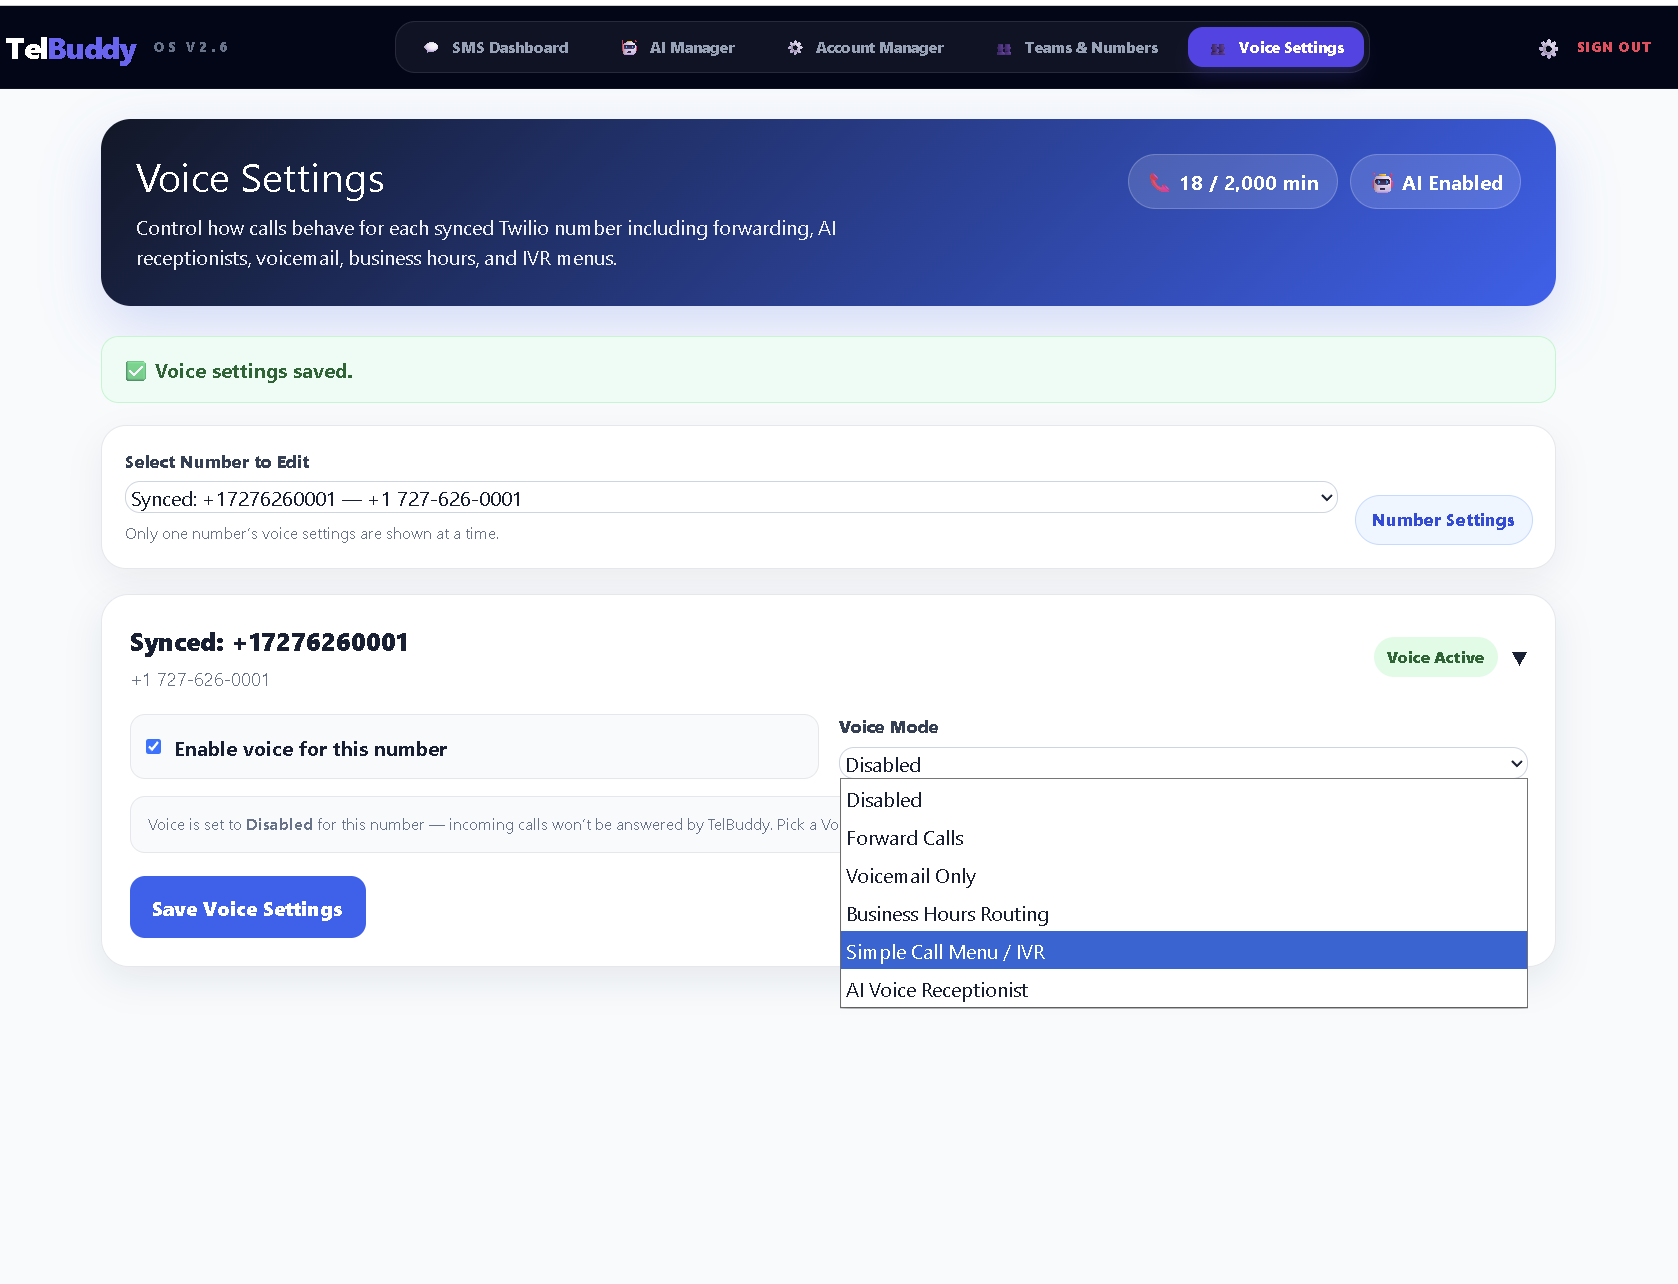
Set the Voice Mode, then open the builder
Set Voice Mode to Simple Call Menu / IVR. This tells TelBuddy that incoming calls should be answered with a menu rather than being forwarded straight through or sent to voicemail.
Then click Call Menu / IVR Builder to expand that section. This is where the menu itself gets built.
-
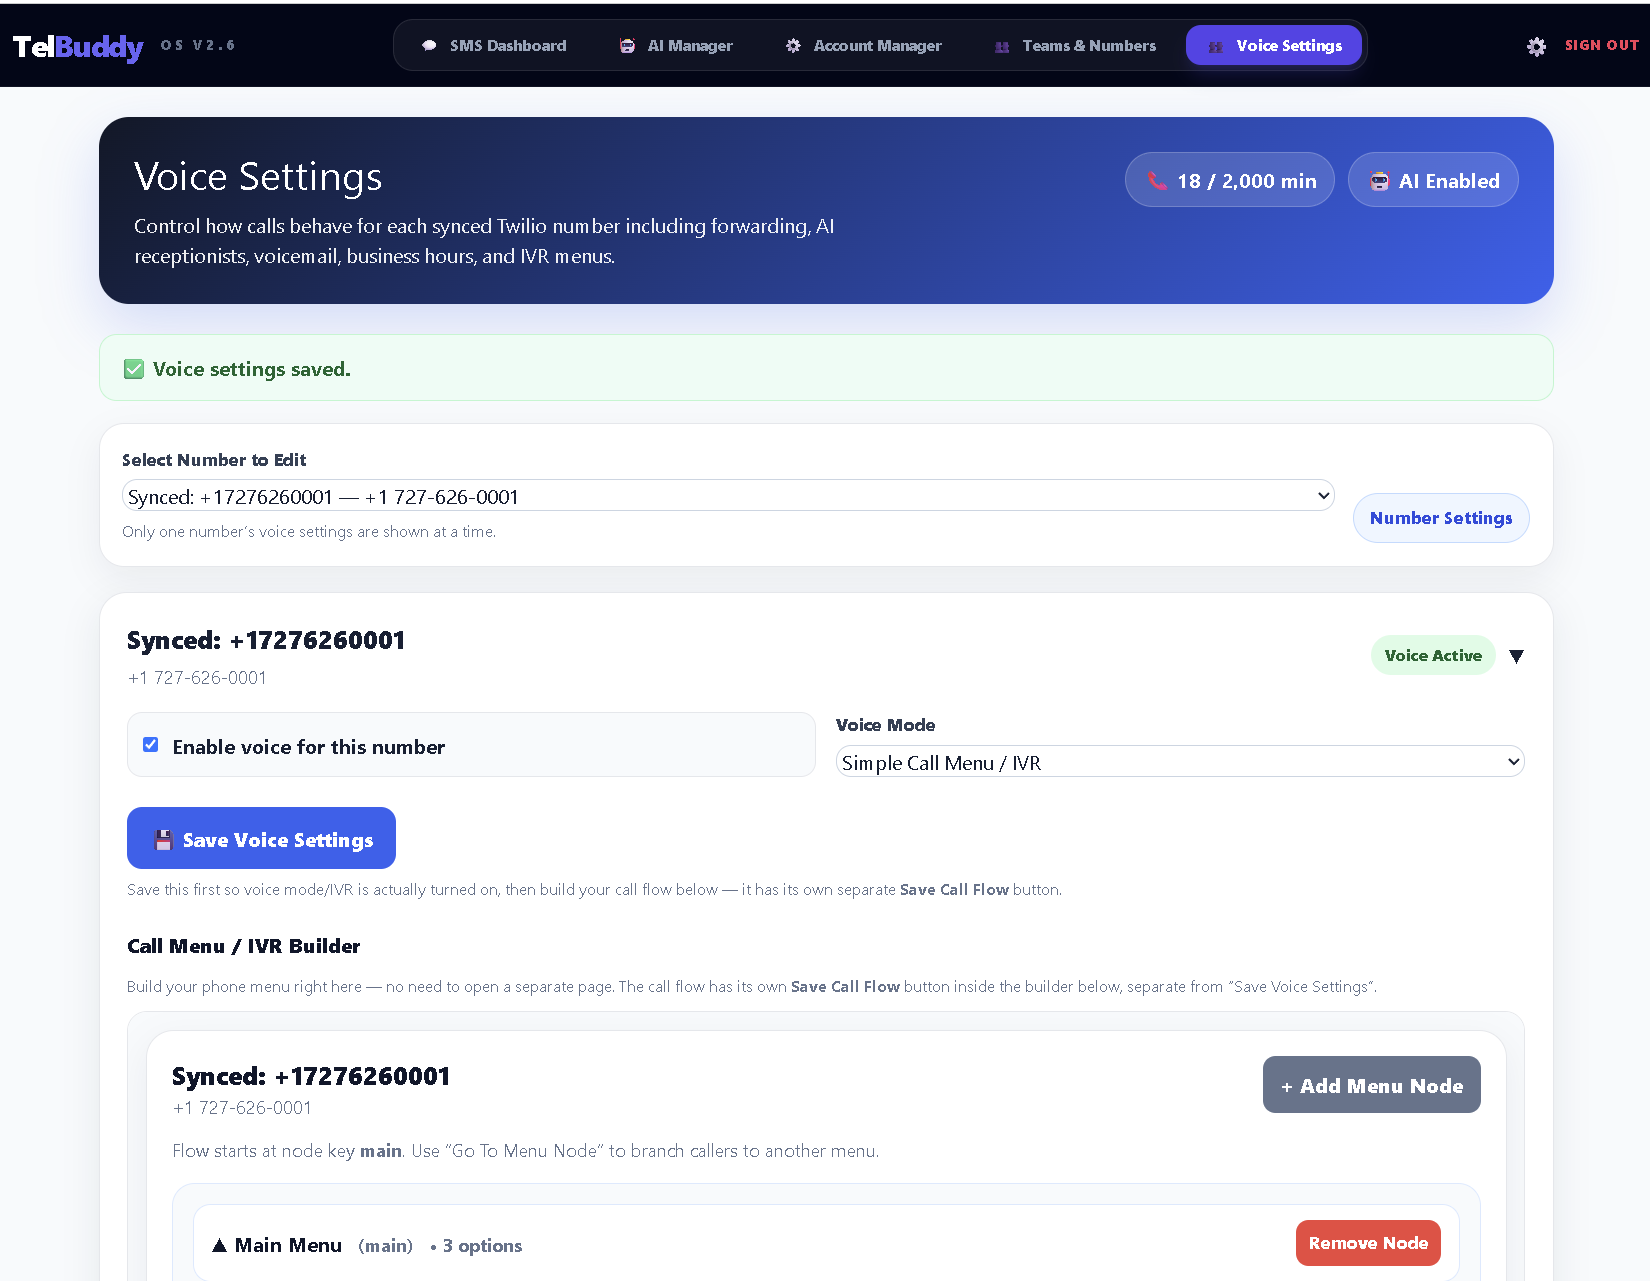
Open the Main Menu node
Every number starts with one menu node called main. That is the menu callers hear first, so it is the one to set up before anything else. Click the row that reads Main Menu (main) to expand it.
Inside, the important fields are:
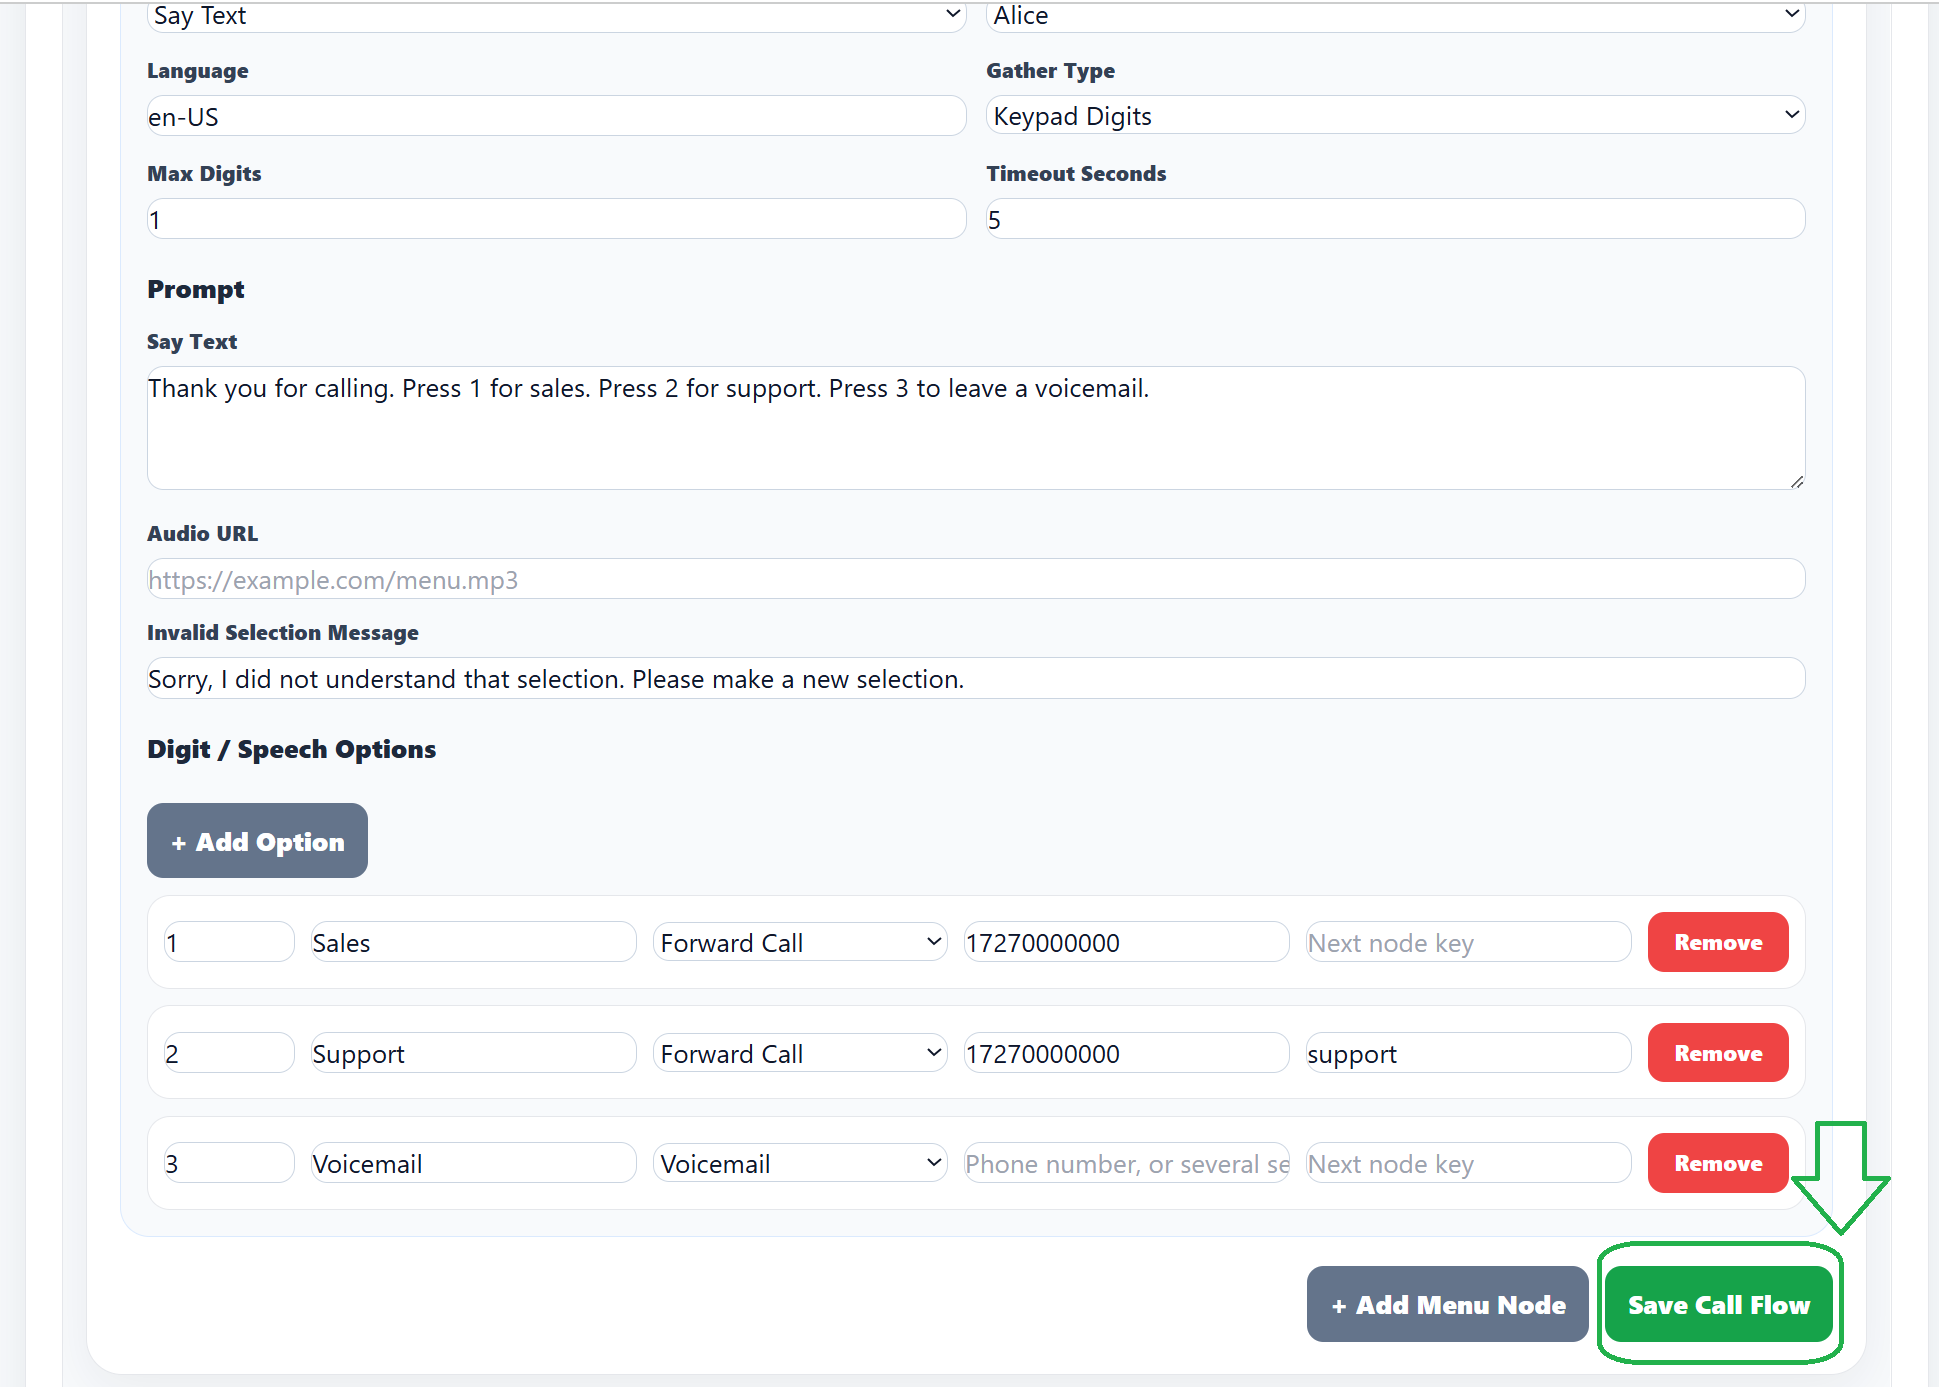
- Prompt Type decides whether TelBuddy reads your text aloud (Say Text) or plays a recording you host (Play Audio URL). Say Text is the quickest way to get started.
- Prompt is what callers actually hear. Write it exactly as you want it spoken, for example: "Thanks for calling. For sales, press 1. For support, press 2. To leave a message, press 3."
- Gather Type decides how callers respond. Digits + Speech is the most forgiving, because a caller can either press a key or just say "sales" and still get where they are going.
- Timeout Seconds is how long to wait for a response before repeating the menu.
-
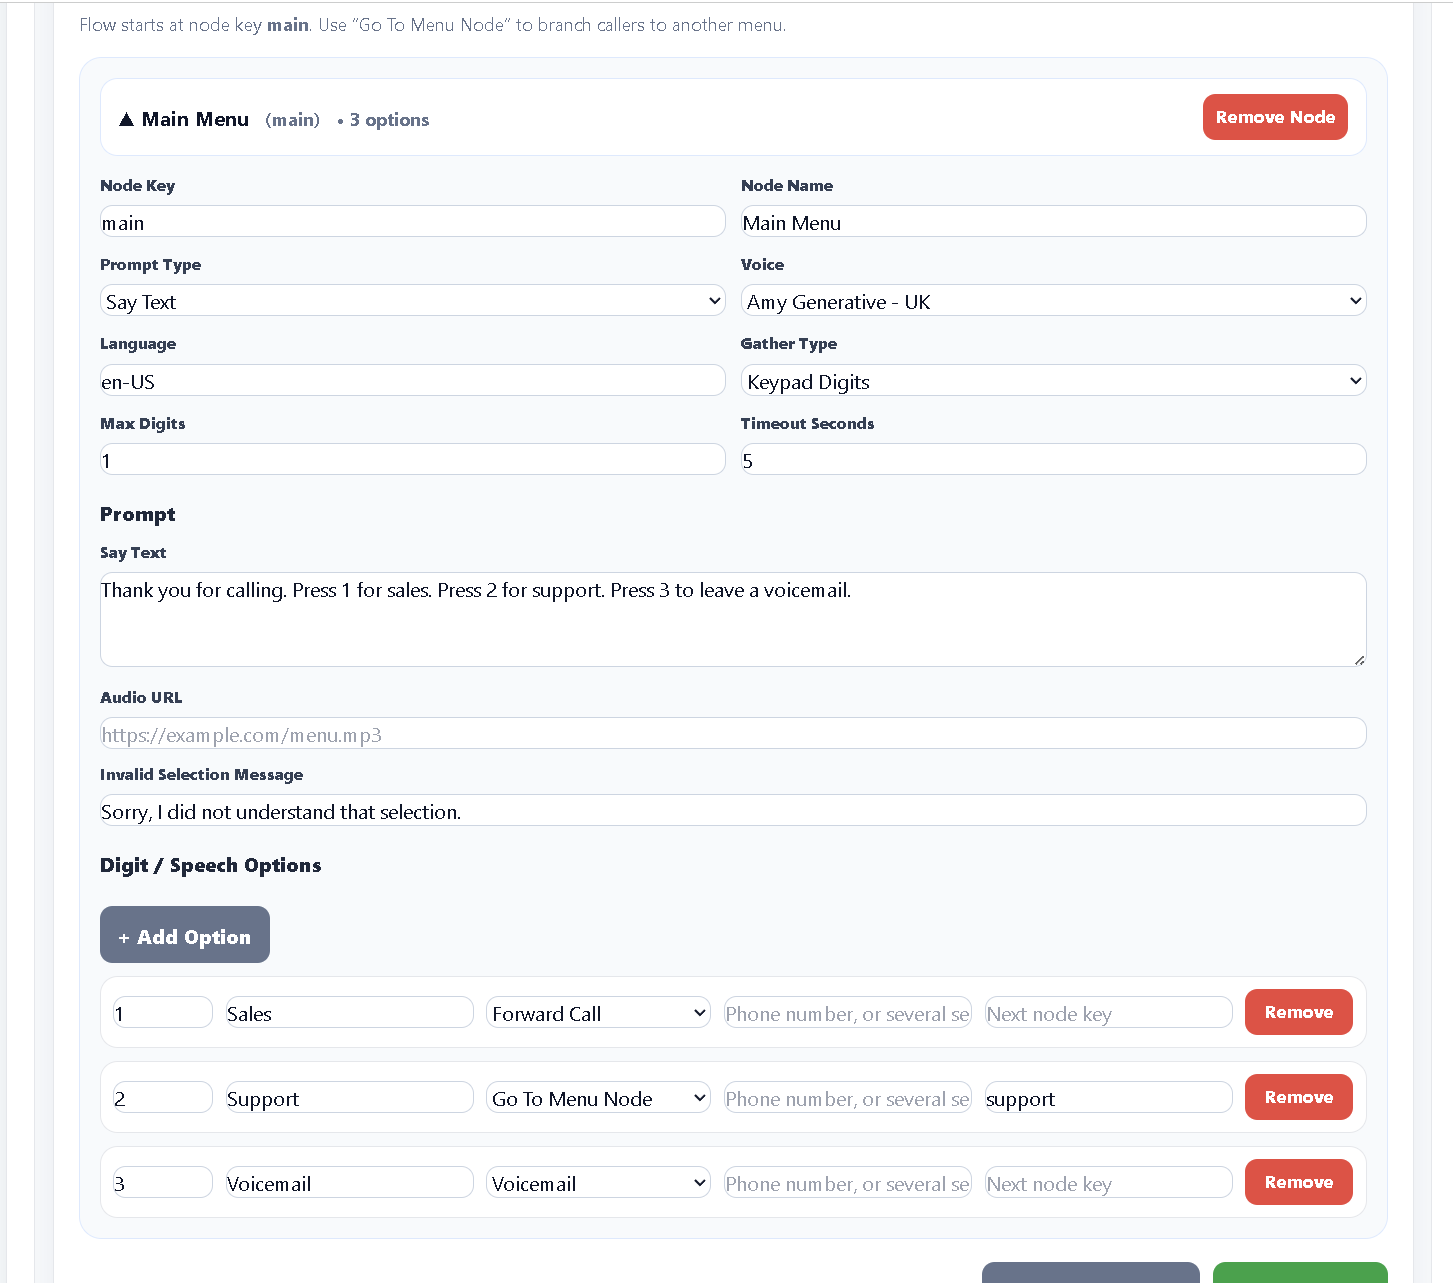
Set your menu options
This is the part that makes "press 1 for sales" actually work. Under Digit / Speech Options, add one option for each choice you offered in your prompt.
For each option, set the Keypad Digits the caller would press, then choose what it does:
- Forward Call rings a phone number you enter. You can list several numbers separated by commas and they will all ring at once, with the first person to pick up taking the call.
- Voicemail sends the caller to your voicemail greeting.
- Repeat This Menu plays the menu again, which is useful for a "press 9 to hear these options again" choice.
- Go To Menu Node sends the caller to a different menu, which is how you build a second level such as "press 1 for sales, then press 1 for new orders or 2 for existing orders."
- AI Receptionist hands the call to your AI, if you have that add-on enabled.
- Hang Up ends the call politely.
Make sure every option you mentioned in your prompt actually exists here. A caller pressing a key you have not configured will just hear the invalid selection message and be sent round again.
-
Save the call flow
Click Save Call Flow once the menu and its options are filled in. The menu is live the moment it saves. There is no separate publish step and no waiting period.
-
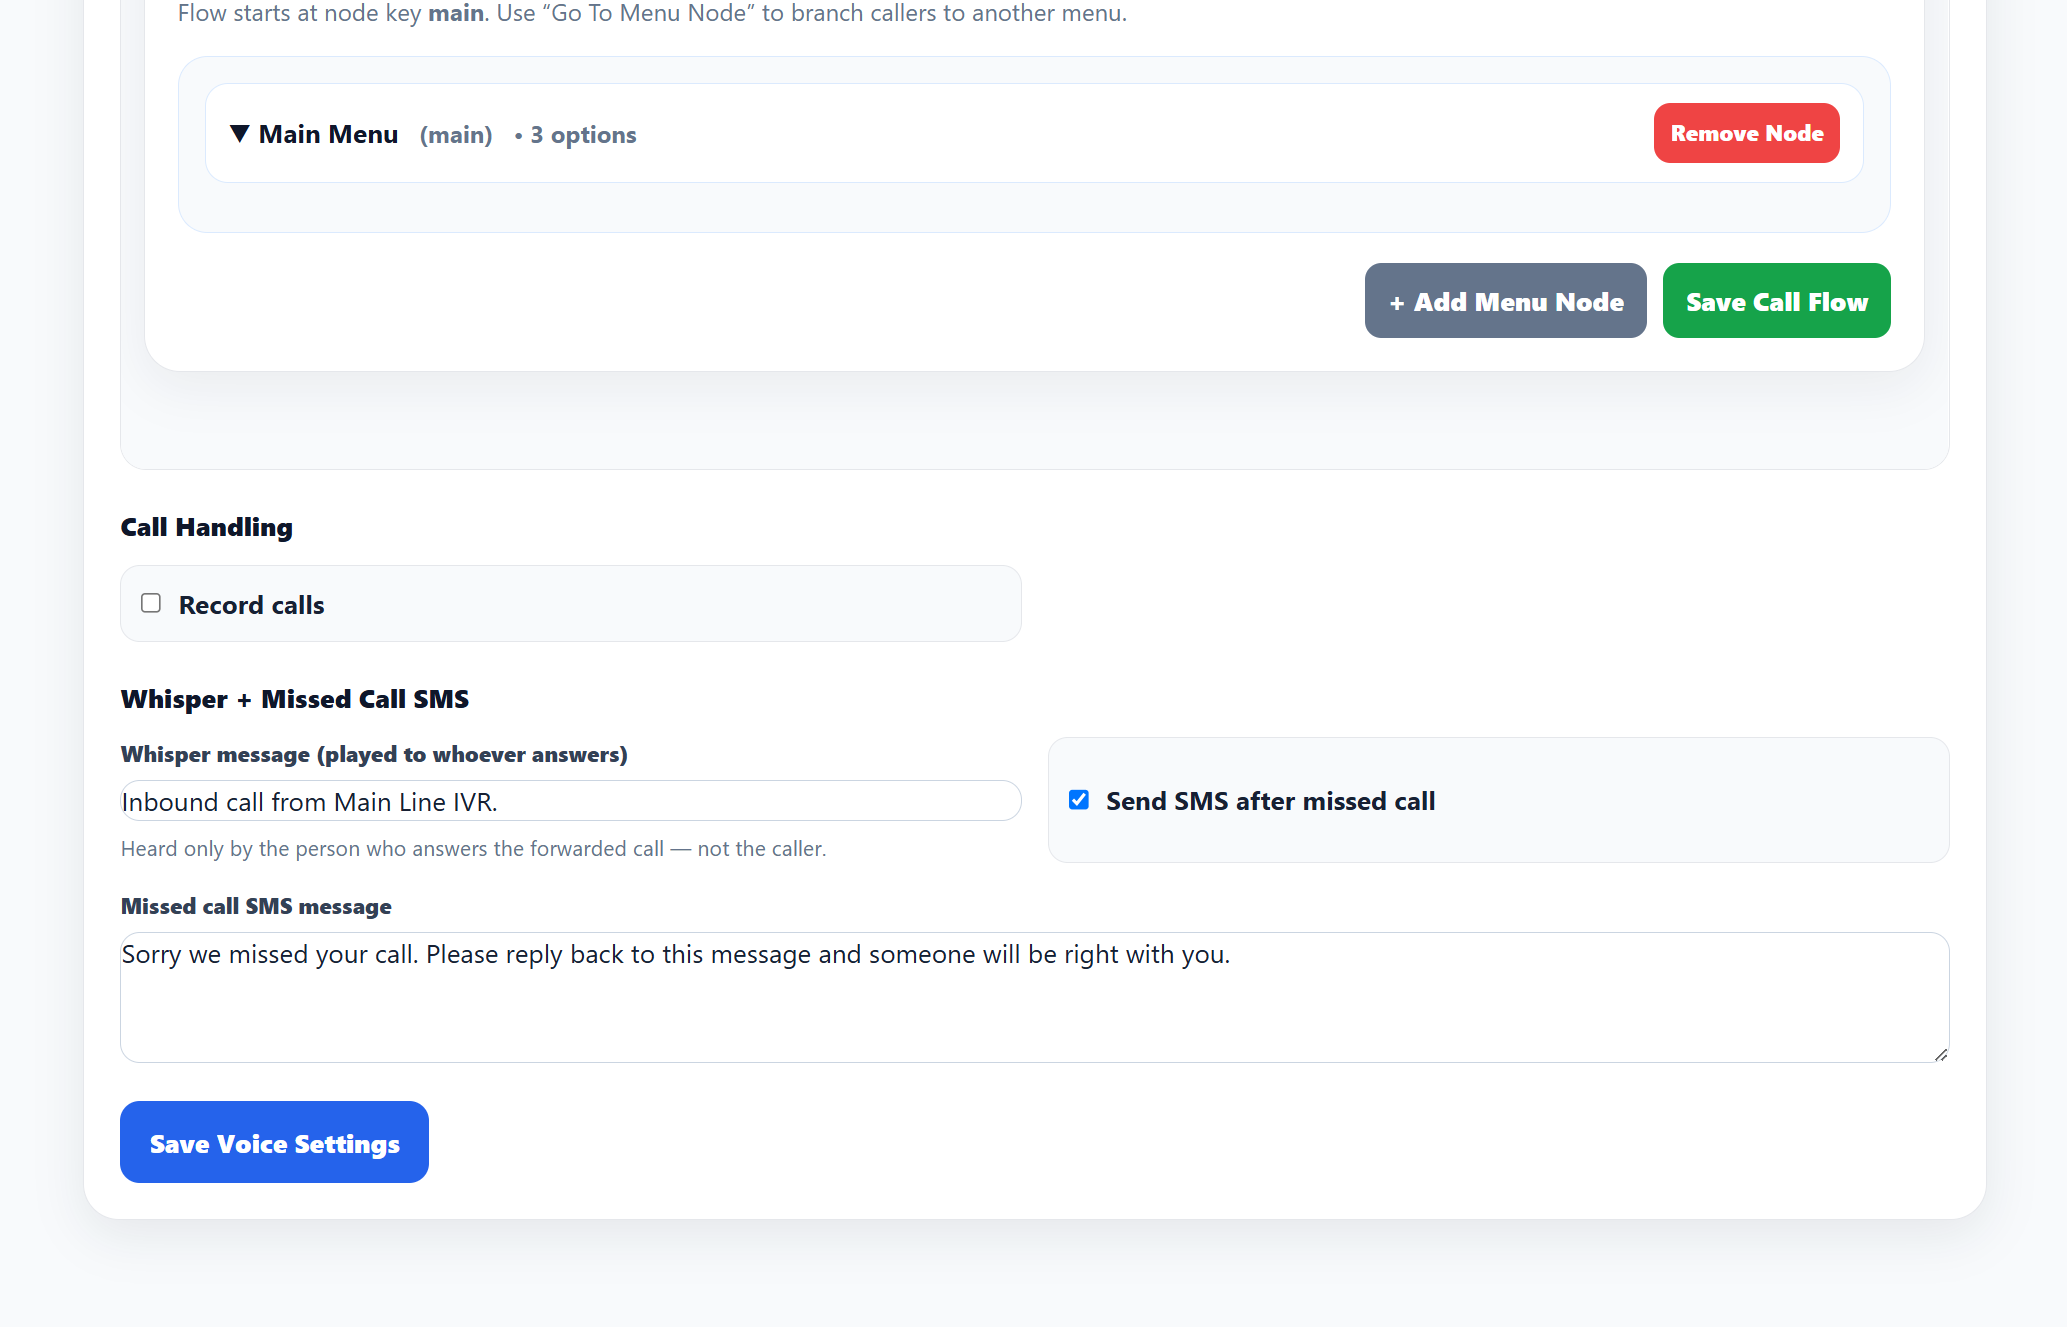
Set up the whisper and missed call text
These two settings are optional, but both are worth turning on.
Whisper message (played to whoever answers) is a short line that only your team hears, right before they are connected. Something like "TelBuddy sales call" tells whoever picks up how to answer, which matters when the call is arriving on a personal mobile.
Send SMS after missed call automatically texts the caller if nobody answers. Callers who would otherwise have given up and rung a competitor often reply to that text instead, so this is one of the more valuable settings on the page.
Test it before you rely on it
Your IVR is now fully set up. Call the number from your own phone and walk through it as a customer would.
Worth checking on that first call:
- The prompt reads clearly and is not too fast
- Every option you mentioned actually goes where it should
- Forwarded calls reach the right phone, and the whisper plays before you are connected
- Pressing a key you did not configure sends you back to the menu rather than ending the call
Test with a real call before pointing your published business number at this. It is much easier to fix a wrong extension now than after customers start hitting it.
Building a multi-level menu
Once the main menu works, adding a second level is the same process. Click + Add Menu Node to create another menu, give it its own Node Key such as sales, and set up its prompt and options exactly as before.
Then go back to your main menu, and set the option that should lead there to Go To Menu Node, pointing at the key you just created. There is no limit that forces you into a single layer, though it is worth keeping menus short. Callers tend to lose patience past about four options or two levels deep.